
Progress Invoicing in QuickBooks
To follow up on our recent blog post about Invoicing Options in QuickBooks, we wanted to do a deeper dive into one of the methods which we’ve been using most frequently on fixed price projects: Progress Invoicing by Percentage Completion. This approach provides a high level of transparency to clients and is based on actual costs incurred. It also has the added benefit of forcing you to to look at a job cost report every time you invoice so you see how you’re doing against your original estimate.
STEP 1: COMPANY SETTINGS
There is one thing you’ll want to check before you start. Go to Edit>Preferences and select the Jobs and Estimates section from the left column. Then highlight the Company Preferences tab. Under the section “Do You Do Progress Invoicing?”, you want to make sure it’s selected as YES.
STEP 2: SETTING UP THE ESTIMATE
You have two options for bringing in your estimate to QuickBooks: through integration with a secondary software (we often use UDA Construction Suite), or by manually inputting it into a blank estimate. This assumes you’re starting from scratch.
1. Open your Schedule of Values document on one screen
2. In QB, go to Customers > Create Estimates > Select Customer name from drop-down menu.
3. On the first line, leave the Item field blank and under Description type in the section name, in this case we’ll start with “GENERAL REQUIREMENTS” (this is so the sub total is clearly identified when we get to invoicing).
4. Then on the second line, under Item choose Group= 01 DIV General Requirements (at the bottom of the drop down Items menu)
5. This will populate the Estimate with all the codes in DIV 01. (Note: if you have not set up Item Groups, this is a great time to do it. Otherwise you can enter each item line by line).
6. Delete out the lines that are not applicable to this Estimate (highlight the line, then CONTROL+DELETE)
7. Now enter in the COST and TOTAL value on each line on the Estimate (ignore Class, Amount, Markup). Don’t change the Description field unless the Schedule of Values also has a modified Description. You want them to match perfectly, with one exception: add the word ALLOWANCE next to any categories with an Allowance.
8. Check to make sure the subtotal for this section matches the Schedule of Values.
9. Once you’ve finished this Division, repeat #4-8 for each subsequent sub-section.
10. At the very bottom insert the Item “Subtotal”, the total should calculate automatically, and type in Original Contract Price under Description. (Any Change Orders will be added under that line).
11. Check to make sure the total Estimate matches the Schedule of Values total.
STEP 3: REVIEW THE JOB COST REPORT
For this whole process to work, you need to be totally up to date on entering your vendor bills, you’ve run payroll and allocated time to jobs so that your job costs are accurate.
1. Reports> Jobs, Times and Mileage> Job Estimates vs. Actuals Detail
2. Select Customer: Job
3. The first time you do this, memorize this report as "CUSTOMER NAME: report for progress invoicing"
4. Review report for any discrepancies. You’re looking for numbers in the Actual Cost column which seem out of line with the Estimated Cost. This can be the result of mis-coded receipts. You want to fix any mistakes before moving on to the next step.
5. Export report into Excel (new worksheet).
6. On the right side of the report create a new column to calculate the % complete of each category. Formula should be = Actual Cost/Estimated Cost. Format the whole column to show % (no decimals). Drag this formula down so it is duplicated on each line.
7. Highlight each line/category which has a % greater than 0%. These are the ones you'll want to invoice for.
8. Any lines that are over 100% mean that the costs are higher than anticipated. Check the original estimate to see if that line is labeled “Allowance” or not. If it is an allowance, you can bill for the full % even if it is over 100%. If it is not an Allowance, it may trigger a Change Order. Or, it might just be a situation where you went over your estimated time and/or materials, and you will lose some of your anticipated profit on that Item.
9. This is also a good time for the Project Manager to review the job progress report before invoicing. There may be categories which are at less than 100% but have been totally completed, which can be fully invoiced.
10. You’ll want to have your Excel sheet on a separate screen, or printed out in front of you, before you move to the next step of Invoicing.
STEP 4: CREATE INVOICE
1. In QuickBooks, go to Customers>Create Invoices and select Customer:Job from the drop-down menu at top. Select Progress Invoice under the Template drop-down.
2. Select the current estimate from the “Available Estimates” window and click OK.

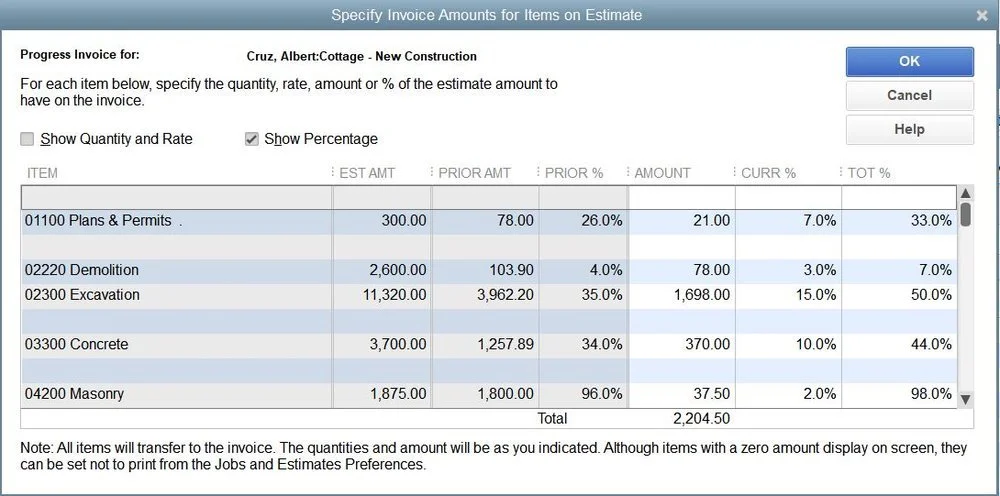
3. Select the 3rd option in the next window: “Create invoice for selected items or for different percentage of each item”.

4. Refer back to your Excel spreadsheet to enter in the percentage you want to bill in each category in the far right column (Total %). If you have already invoiced this customer, you’ll see the amount and percentage previously billed. You want the Total % column to match your Excel file.
5. Review the invoice on your screen, then hit Print Preview to see how it will look in PDF view.

6. You may need to go back and tweak the descriptions on the Estimate to get the Progress Invoice to look exactly the way you want. By using the Groups feature when you set up the Estimate, you can get a subtotal for each Division which is nice (which should match back to the Schedule of Values).
7. Once your invoice is ready to send, we recommend adding a section at the bottom of each invoice with the following information:
Original Contract Price:
Updated Contract Price with Change Orders:
Deposit Received:
Previously Paid:
Current Due:
Amount to Complete:
Note: These totals need to manually calculated on each invoice. Review back to the previous invoice and update accordingly.
STEP 5: CHANGE ORDERS
When you have created a new Change Order, go to the original Estimate, and add a line at the bottom for Item= Change Order (with number if they are broken out as separate Items), Description = Change Order #1 and a short description of what this involves. This will then adjust the project total and you can invoice against this line.
TO LEARN MORE…
We created a simple screen share video to walk you through the steps.